Tuesday, July 31, 2018

Chicken Wings - (Buffalo sauce and mango chili lime sauce)

Hi guys,
How are things? Even though the World Cup is over now I would like to share a dish for the game nights. Can you guess the name of the dish. Silly me, I have already dropped the name in the title. Yes, I am talking about the wings. On any pizza nights, the buffalo wings are must in our family. Before we used to get these from the pizza stores as a side dish. Then I started making these and needless to say, the homemade ones are healthy and even taste better. Originally the chicken wings are deep fried and tossed in the sauce and served with celery sticks and blue cheese dipping sauce. The history of Buffalo Wings has an interesting story. Don't get confused with the name "Buffalo Wings" as it is never made with buffalo. Actually, Buffalo Wings were invented in a bar in the Buffalo city of New York, where the co-owner fried some leftover wings and tossed them in a hot sauce. She served them as a late night snacks to her kid and friends. Then it was put in the bar menu and it became an instant hit. Today I will share wings tossed in two different sauces - the all time favorite Buffalo sauce and my own creation mango chili lime sauce. I will also share a fast easy but very healthy dipping sauce with only two ingredients.
Chicken wings tossed in buffalo sauce and mango chili lime sauce
Chicken Wings with celery sticks and dipping sauce


Recipe 16 servings

 Baked Wings

Ingredients

16 pieces of chicken wings
1/2 tbsp oil
1/2 tsp crushed black pepper
1/2 tsp garlic powder
salt according to taste
some aluminum foil or parchment paper

Methods

1. Preheat the oven to 400 F
2. In a mixing bowl add the clean chicken wings. Dab some paper towels to remove excess water. (Note: There should not be any excess water on the surface of the wings.)
3. Add all other ingredients and mix it well.
4. Cover a baking tray with aluminum foil. Now put all the wings on the tray in one layer.
5. Bake the wings for 16 minutes and flip those. Again bake those for 16 mins.
6. Once baked, take out the hot wings from the baking tray carefullykeep aside.
marinated chicken wings before baking

Baked Chicken Wings

Buffalo Sauce

Ingredients
2 tbsp butter
1/4 cup hot sauce
3/4 tsp garlic powder
sugar according to taste

Methods
1. In a small saucepan add the butter and heat it. Once the butter starts melting add the hot sauce and all over ingredients except sugar. Mix it well.
2. Add the sugar and taste it as the sugar will balance the sourness of the hot sauce.
3.Remove the heat and keep aside to cool off
Buffalo Sauce


Mango Sauce

Ingredients
1 finely minced green chili
1/4 cup mango sauce
1/2 tsp red chili powder
1 tbsp lime juice
salt according to taste
sugar according to taste


Methods
1. Heat a small sauce pan. Add all the ingredients except salt and sugar. Then mix it well by stirring continuously.
2. Taste it and adjust the salt and sugar accordingly. 
3. Heat the mixture until it comes to boil.
4. Remove the heat and keep it aside to cool off.
Mango Chili Lime Sauce


Assembly of the wings
Now heat a shallow frying pan. Add the sauce and wings into the pan. Then toss them properly so that each wing is covered with the sauce. Then remove the pan from the heat and serve them hot.
I have made 8 Buffalo Wings using the Buffalo sauce. and 8 Mango Lime Chili Wings using the other sauce. 
Sauces

Mango Chili Lime Chicken Wings

Buffalo Chicken Wings

Dipping Sauce

Ingredients
1/3 cup Greek yogurt
1 tsp ranch dressing powder (preferably Hidden Valley)


Method
In a bowl add the ingredients and give a stir to mix it well. Serve that in a nice dipping bowl.
Dipping Sauce

For serving wings it is also important to have celery sticks. So cut some celery sticks (finger size).
Serve the hot wings, celery sticks with the dipping sauce. This is a group food and you can easily make it in a gather or for just two of you (if you are couple). This is a nice appetizer what can make any game night hit and will definitely give you a winner position among your friends.

Thanks,
Moumita


Thursday, July 26, 2018

Masoor daler bora

Hi Friends,
Hope you are doing well. I have a baby who is little sick this week. When my baby is not well,  I prefer to stay with him all day. This is the time when I would like to follow with quick and easy recipes. Today I will share my mom’s masoor daler bora, which is quick but a very delicious snack. It can easily become a companion with dal and rice. When I used to get sick in my childhood, I used to nag my mom to make these for me. I know in my native country, it is raining and this is the season of telebhajas (deep fried snacks) like beguni, fuluri, chop, piyaji etc. And hence I am making my version of telebhaja.  Today I will also share the low calorie version of this yummy simple snack as requested.  So, lets start.
easy snack recipe on musur daler bora with low calorie
Masoor Daler bora

Grilled Masoor daler bora (low calorie version)


Recipe yields 12 serving

Ingredients


  1. 1 cup masoor dal( Red Lentil)
  2. 1 medium  size onion chopped into small pieces
  3. 2 big fat garlic cloves chopped into small pieces
  4. 1/2 tsp cumin seed
  5. 1/2 tsp poppy seed
  6. 1 green chili chopped into small pieces
  7. 1/2 cup mustard oil
  8. Salt according to taste


Method

1. Soak the dal in water for 1 hour at least.
2. Now in a blender grind the dal with little water. (Note: The blended dal should be on the little coarse side not completely smooth)
3. In a mixing bowl add the dal puree and all the ingredients except oil. Give it a good mix. ( Note: while adding salt, check the salt level)
4. Heat the oil in frying pan. When the oil is hot, with the a spoon drop some clumps of the dal mixture. Fry them and then flip it and fry. While frying the heat should be on medium, so that boras get cooked in the inside.  (Note: Try to shallow fry the boras. Try not to overcrowd the pan with boras)
5. Take out the dried boras on a plate lined with some paper towel to avoid excess oil.


For the low calorie version, all the ingredients are same except oil contains low calorie. So, I have adjusted the oil level to 1/2 tbsp (1/2 tbsp oil yields 62 calorie)

Recipe yields 4 medium serving (around 82 calorie total)

Ingredients


  1. 1/2 cup masoor dal(Red Lentil)
  2. 1/2 medium  size onion chopped into small pieces
  3. 1 big fat garlic cloves chopped into small pieces
  4. 1/4 tsp cumin seed
  5. 1/4 tsp poppy seed
  6. 1/2 green chili chopped into small pieces
  7. 1/2 tbsp mustard oil
  8. Salt according to taste


Method

1. Soak the dal in water for 1 hour at least.
2. Now in a blender grind the dal with little water. (Note: The blended dal should be on the little coarse side not completely smooth)
3. In a mixing bowl add the dal puree and all the ingredients except oil. Give it a good mix. (Note: while giving salt, check the salt level)
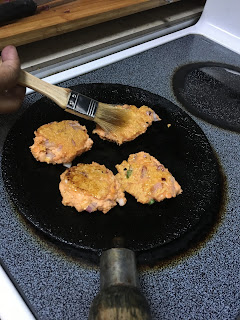
4. Heat a tawa or iron griddle. Brush some oil on the hot surface. With a spoon drop  some clumps of the dal mixture. Fry them and then flip those and brush the surface of the boras with some more oil. While frying the heat should be on low to medium and tawa should be covered with a lid so that boras get cooked evenly. Flip again and dab some more oil with the brush.  (Note: Try not to overcrowd the pan with boras)
5. Take out the dried boras on a plate lined with paper towel.


This recipe is easy with few ingredients. The  poppy seeds along with the coarse texture of the dal will bring crunch in your mouth. These savory and spicy boras can become your evening tea partner. Try it and let me know if you have any question. Enjoy the season and stay healthy.


Thanks,
Moumita


Friday, July 20, 2018

Dimmer devil- potato stuffed scotch eggs

Hi Friends!
Let me ask how many of you look forward the evening tea snacks? I think all of us crave for it after coming from a long day work. Today I will be blogging about Dimer Devil. Don't worry the taste of it is completely opposite to the devil. It is a savory snack made with boiled eggs and it makes an absolute partner with evening tea. In Kolkata, Dimer Devil is available in street side restaurant or small cafes. They are usually prepared with eggs wrapped with mutton keema (cooked minced goat meat). I made this deviled eggs with potato stuffing layer as I was in a hurry. This recipe is very quick and does not need a lot of ingredients. They also make a good appetizer to entertain your guests without breaking your bank. So, without any further due, lets start.

Dimmer Devils Scotch eggs with potato


Recipe yeilds 12 servings.

Ingredients for Potato stuffing/filling

  1. 4 medium to large size potatoes
  2. 1 medium size onion
  3. 1 tsp ginger paste
  4. 1 tsp garlic paste
  5. 1 tsp cumin powder
  6. 1 tsp coriander powder
  7. 1 tsp turmeric powder
  8. Chili powder according to your taste
  9. Salt according to your taste
  10. Sugar according to your taste
  11. 1 green chili
  12. 1/2 tsp of garam masala powder
  13. 2 tbsp of oil
  14. Few sprigs of cilantro leaves


Methods for Potato stuffing/filling
1. Chop the onions, green chili and cilantro into small pieces.
2. Make some slit marks on the surface of the potatoes and boil them. Remove the skin and throw the remaining water. Let the potatoes cool. Mash the potatoes nicely.
3. Heat a pan and add some oil in it. When the oil is hot add the onions. When the onions are translucent add the mashed boiled potatoes. Now add the pieces of chili, ginger paste, garlic paste and cook it for 2 mins. Then add all the spices mentioned in the ingredient list and give a good stir. Cook for another 3-4 mins stirring continuously. Taste it and adjust the salt and sugar accordingly. At the end add the cilantro leaves and give another final stir. Remove the pan from the heat and let it cool.

Ingredients

  1. 6 boiled eggs cut into half
  2. 1 egg for binding
  3. 1/2 cup of besan (chickpea flour)
  4. 2 cups if bread crumbs
  5. 1 cup oil for frying


Methods

1. Now you have 12 boiled egg-halves (Cut the 6 boiled eggs into 12 halves).
2. Try to make 12 equal portion of the potato stuffing. (Note: Don't worry if they are not accurately equal. You can always adjust the shape)
3. Take a piece of boiled egg half and cover it with the one portion of potato stuffing. Cover all the surface and make sure the surface is smooth enough.
4. Repeat the step 3 for all the egg halves.
5. Now dust the egg halves with besan (chickpea flour).
6. In a bowl crack an egg and beat nicely. The egg wash is ready.
7. Add the breadcrumbs in a dinner plate. Spread the breadcrumbs uniformly.
8. Now take an egg half covered in potato stuffing dusted in besan. Dip it in the egg wash and the roll it in the breadcrumbs plate. Coat it with the breadcrumbs nicely. (Note: Try to smooth the edges of the egg halves with proper coating of breadcumbs as they tend to crack near the edges)
9. Repeat the step 8 for all the pieces. Once all the pieces are ready let them rest in the fridge for some time.
10. Heat the oil in a large size frying pan. Fry those deviled eggs all the sides by flipping them frequently. Once they are golden brown on the entire surface, take those out in a plate lined with paper towel. The paper towel will soak the excess oil. (Note: You can easily shallow fry those. Deep frying is not needed. Use meticulous hand while flipping those so that they don't break)


Serve those heavenly dimmer devils with condiments like Ketchup and Kasundi (mustard sauce). In a separate plate add some cucumber, onion and tomato slices with some lemon juice and pinch of rock salt. Have this salad as a side with this appetizer and you will be sorted. This savory snacks will be sufficient to satisfy and fill everything- your mood, your tummy and off course your money. Do let me know if you have any question in the comment sections. And I am waiting for all your comments to get filled in the comment section of Comfort Saveur.


Thanks,
Moumita


Wednesday, July 18, 2018

Moong Ilishe - Lentil soup made with green gram and Hilsa fish head


Hello Friends!
How are you? I am getting used to with this blogging slowly. And now I am loving it. Hope you guys love my blog as well. I love to recreate some family recipes. Speaking of the family recipes, two sides of my family have some differences in terms of food cultures. My side is Ghoti and my in laws are Bangal. If you are from Bengal, you are familiar with these terms. For those who don't know, the people whose ancestry originated from east Bengal (now Bangladesh) are called Bangal. The people whose families are living in West Bengal for generations, are called Ghoti. Both used to have their own unique accent, cooking styles, favorite fishes, and even favorite Football teams. As a foodie I enjoy both the types of foods. The dish I am going to talk about now, was introduced to me by mamoni (my mother-in-law) in a family event. Being away from my native country, I get rare chances to enjoy food cooked by mamoni. But the ones, for which I got lucky to taste, will be shared in my blog. She is one of those people who inspired me a lot to pen down this blog. Therefore I am going to introduce a dal made with fish (Ilish) head. This dal is so simple but so flavorful with fish head that can make the Ilish (Hilsa) haters love the fish. I know Ilish (Hilsa) has its distinct smell, flavor and lots of fine bones. And many of us can't appreciate it. It is not something that you can eat with fork and spoon. Yes, you have to use your hand, sometimes even two hands. Now let’s start the cooking.

Moong Ilishe


Recipe yields 6 servings

Ingredients
  1. 1 cup moong dal (skinned spilt green grams)
  2. 1 medium size Ilish(Hilsa)  head cut into medium pieces
  3. 2 green chilies
  4. 2 red chilies
  5. salt according to your taste
  6. sugar according to your taste
  7. 2 tbsp mustard oil
  8. 1.5 tsp ginger paste
  9. 1/2 tsp cumin seeds
  10. 1-2 bay leaves
  11. 1.5 tsp turmeric powder

Methods

1. Marinate the fish head pieces with salt and 1 tsp of turmeric powder. Keep it aside.
2. Heat a  sauce-pan or dutch oven pan. In that pan add the moong dal and dry roast it in low flame till you get the nutty fragrance of the dal. (Note: Use a pot with depth as you will be boiling the dal. Please try not to cook the dal with a pressure cooker. Stir the dal with a wooden spatula continuously to avoid burning.)
3. Once you get the aroma and the color of the dal turns opaque and golden brown add water, salt, green chilies. Let it boil, skim off. Discard the foam that arises on the top. Frequently check if the dal is soft enough. Add 1/2 tsp of turmeric powder. (Note: The dal should be soft enough but all the dal pieces shouldn't turn mushy. There should be some dal pieces turn soft but remain intact in shape)
4. In another frying pan heat the mustard oil. Add the marinated fish head pieces and fry those. When they were fried, add the ginger paste, cumin seeds, red chilies and bay leaves. Fry once more for 2-3 mins in medium flame. (Note: The fried fish head pieces should not be over fried and crunchy. They should be soft enough to absorb the flavor of the dal)
5. Now add the fried fish with all tempering ingredients into the boiled dal soup. Stir it continuously with the heat on. Let it boil once more. Check the salt and sugar. If needed adjust the salt and sugar. This dal should be little on the sweeter side. Thus adjust the sugar according to your taste.


Serve the dal with steaming white rice and some fries of your choice. Sweet potato fries or simple potato fries will be nice as sides for this dish. This dal can be prepared quickly and it can bring special feeling in the daily mundane weekday’s meal. This is the season (rainy season in India) for Ilish(Hilsa) fish and sometimes we don't have ingredients for making a curry with fish head. But Moong dal is a staple in household pantry and don't need any planning to prepare this dish. Try it before the Hilsa season is over, and let me know how much you like it. And please use your careful hands and teeth to eat the fish without getting the fine bones stuck in your throat.


Thanks,
Moumita

Thursday, July 12, 2018

Mango mousse - dessert made in heaven

Hi Friends,
Once again thank you for browsing my blog. How do you like the Comfort Saveur? Please give me your feedback in the comment section. I am very new to blogging and need your feedback to improve. Now summers are known for its fruits and berries. Speaking of summer fruits, first thing that comes to mind is mango. A juicy ripe mango is good enough for a dessert. All of my family members are fond of ripe mangoes. But I am not so much. Nevertheless "you eat with your eyes first". If the mangoes are in presentable and palatable form, then i can rather enjoy it than eating the pulp from the stone fruit itself. Hence comes the mango mousse. It looks not only pretty but also tastes divine. It does require some planning and patience to chill. I have prepared this mousse in two ways - mango mousse cake with the help of spring form pan and mango mousse in a glass. Today I will show the preparation of mango mousse and the presentation in a glass. The mango mousse in a glass brings such an elegance and temptations in a single serve dessert. I have presented in layers. The ingredients and the methods for each layer is demonstrated in the recipe.

Mango Mousse

Mango Mousse with layers in a glass


Recipe -5 servings

Ingredients for layer 1 (Mango Mousse)

  1. 1 cup of mango pulp ( from can or use blender to pulp two medium size ripe mangoes)
  2. 1 cup of heavy whipping cream
  3. 3/2 tsp of unflavored gelatin
  4. 2 tbsp of sugar ( depending on the sweetness of mango pulp)
  5. 2 ounces of hot water ( Note: Water so hot enough to dissolve the gelatin)


Methods
1. Add the gelatin in the cup of hot water. Stir until the gelatin dissolves and there is no lump.
2. In a mixing bowl add the cream and mango. Using a hand mixer whisk till soft peaks appears. Add the gelatin water solution and whisk it again for a min. Now add the sugar and give a good stir.
3. Pour in the champagne glass or parfait glass or clear glassware of your choice. And keep those in the fridge for 4 to 5 hrs.  If you are making the second layer take it out after 4 hours.

Ingredients for layer 2 (Mango Jelly)

  1. 3/4 cup of mango pulp
  2. 1 sachet of unflavored gelatin
  3. 1 tbsp sugar
  4. 1/4 cup of hot water


Methods
1. In a cup add the hot water and sprinkle the gelatin powder. Stir it until it completely dissolves with no lumps.
2. Add the mango pulp in a mixing bowl. Now pour the gelatin solution in that bowl and mix it nicely.
3. Now carefully pour the mixture in the mousse glass as the second layer. And let it chill for an hour.

Ingredients for layer 3 (Garnishing layer)

  1. Some chopped mango pieces  (bite size)
  2. Few mint leaves
  3. Some blue berries
  4. Some whipped cream (Note: make your own whipped cream by whisking 1/4 cup of heavy cream, confection sugar and tsp of vanilla extract)
  5. One ziplock bag


Methods
1. Take a ziplock bag and sniff a cut on one of the corners and fit a star piping cone. Add the whipped cream in the ziplock with piping cone.
2. Take out your dessert glasses with two layers and then pipe out some cream stars out of it.
3. Add some chopped mango cubes, mint leave and blue blueberries.
(Note: You can use other things like nuts, cherries or berries according to your taste. You can go with your imagination and create new masterpiece)
Mango Mousse


You can make ahead and keep it for a day. When you want to serve, take those out from the fridge and let it rest outside for at least 10-15 mins. Serve it cold with long dessert spoons to scoop out the heaven. Prepare this in a party or family gatherings. Your guests will go nuts and think you have spent so much time and effort to create this. Let them think that and your secret will be safe with me. Hope you and yours guests like this simple but elegant summer dessert.
Thanks,
Moumita 

Tuesday, July 10, 2018

Paloma - the drink in the sunset

Hi Friends,

Hope you are doing well, in this summer. Some of you may be enjoying the Monsoon. Since I am away from the home country and the Monsoon is not visiting here, everyday I enjoy sunset from a small garden in my backyard. While mesmerized with the colors of the sunset, I got a request from one of our friends to create a new cocktail. I don't know much about cocktails or wines. But my friends praise my spicy bhaja masala (dry roasted spice blended ) margarita, which, I will share in another post. Anyway when I started searching for a new cocktail to try and my eyes captured the one with the sunset hue. Well, this peach sunset hued drink also has a beautiful name Paloma (meaning Dove, peaceful). Paloma is real an easy cocktail with two simple ingredients - grapefruit juice and tequila usually served in a tumbler glass. You can't go wrong with it.
So, lets get tipsy.
Paloma Drink


Recipe for one serving

Ingredients
1. 2 ounces of freshly squeezed grapefruit juice
2. 2 ounces of tequila
3. 1 ounce of honey syrup
4. 5-6 ice cubes
5. 2 ounces of soda
6. 1 tbsp lemon juice
7. 1 tbsp coarse sea salt
8. 1 tsp mixture of lemon zest and grapefruit zest
9. 1 lemon slice to rim the glass
10. Some slices of lime and lemon for garnish

(Note:  Here the measurement for the ingredients is mentioned for one serving. Adjust the measurement according to the number of serves)


Ingredients for honey syrup
1. 1/4 cup of honey
2. 3/4 cup of water


Methods
1. Make the honey syrup by adding the honey and the water in a bowl. Heat it till the honey melts and dissolves in water. Let it cool. (Note: You don't need to wait for the mixture to come to a boil)
2. In a plate add the sea salt, zest of lemon and grapefruit and spread them in one layer. Now apply the juice of lemon slice on the rim of the glass tumbler. Then quickly coat the rim of the glass with the sea salt and citrus zest mixture. Add 3-4 cubes of ice in the well rimmed tumbler.
3. Now in a shaker add 2 cubes of ice, lemon juice, grapefruit juice, tequila, honey syrup and shake it well. Now pour the mixture form the shaker to the tumbler carefully so that it doesn't hamper the salty rim.
4. Finally pour the soda and garnish the tumbler with some lime and lemon slices.


Serve the drink with some sweet and salty cheese crackers or chips. This drink has a unique aroma of citrus grapefruit. The wild floral smell of the honey complements the drink very well. Try the recipe with friends by adjusting the measurement of servings. Let me know in the comment section how it turns out.

Paloma Drink

Thanks,
Moumita


Monday, July 9, 2018

Quiche - the weekend breakfast


Hi Friends,

How are you?  Are you enjoying the heat in your summer? When temperature is high I don’t like to cook on my stovetop. But we have to eat, right. Therefore comes the oven to rescue me and I don't have to stand near the oven for some time. Weekend breakfast is always special to my family. On weekdays breakfasts are always in a hurry and I have to take the help of store brought stuffs. Where as in weekends, we enjoy our blissful mornings with special homemade gastronomy. Today I will share the recipe of a French breakfast, Quiche. Quiche is a savory pie/ tart which is filled with cream, eggs, vegetables, cheese and meats. The filling can be prepared with anything of your choice. But let me warn you it is not a diet food. It contains cream. Come on, this is weekend. We need to indulge. This recipe is inspired from Entertaining with Beth. But this is my version where I have made some changes according to my taste. I have a quicker version where I take the help of store brought piecrust or puff pastry sheet. But homemade piecrust always tastes better.

Quiche


Recipe

Ingredients for Pie crust

1. 1 cup flour
2. 2 tbsp flour for rolling the dough
3. 1/4 tsp salt
4. 1/4 tsp sugar
5. 1 egg
6. 2 tsp water (put some ice cubes in the water)
7. 1/3 cup (6tsp) ice-cold butter cut into cubes


Methods
1. Add flour, salt and sugar in a bowl, mix them well. Add the butter and with clean hands cut the butter and mix it with your flour until it resembles coarse crumbs. (Note: If you have a food processor,  add flour, salt, sugar and butter. Pulse until it reaches the texture of coarse crumbs)
2. In a cup add the egg and whisk it with ice-cold water.
3. Add the egg wash in the bowl of flour mixture. Mix it with your hands until it forms a dough ball.
4. Roll the dough with the extra flour. Try to roll in a circle shape that fits 8-9 inch tart/pie pan. You don't have to get exact shape and size of the pie sheet. You can always adjust to fit it in the pan.
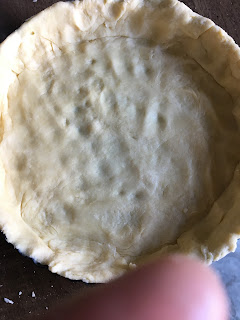
5. Place the pie crust in your pan. Try to fit it at the bottom and the sides of the pan using your back of the palm. If you are using a tart pan, then it is done. It has in built in ridges. But in case of a pie pan you have to make the ridges with your fingers.
6. Once the pie crust is placed nicely in the pan, keep the pan in the fridger for an one or two hours.
 (Note: You can keep the pie dough ball in the fridger for a longer time by forming it into a disc shape and wrapped with cling wrap. When you want to make a pie/tart or quiche you can take it out and thaw it. Then roll it in to a sheet and your pie crust is ready)


Ingredients for the filling
1. 6 eggs
2. 1/3 cup of cream
3. Nutmeg
4. Salt according to taste
5. 1/2 red bell pepper
6. 8-10 asparagus
7. 1/2 small onion
8. 1 chicken sausage link
9. 1/3 cup packed shredded mozzarella cheese
10. 1/4 tsp freshly cracked black pepper


Methods
1. Cut the vegetables red bell pepper, asparagus and onion into small pieces. Cut the sausage into small pieces.
2. In a frying pan heat some olive oil. Add the sausages first and start frying for 2-3 mins. Add the vegetables and add a pinch of salt. Then fry them with the sausages. Once they are cooked take it out in a bowl and let it cool. (Note. The vegetables should be soften but little firm, they should not be mushy)
3. Preheat your oven to 350°F.
4. In a large bowl crack the eggs. Whisk it with a whisker. Sprinkle a pinch of freshly grated nutmeg powder, salt and the black pepper. Add the cream and whisk it again. Now add the fried vegetables and sausage and mix them thoroughly. Finally add the cheese and mix it nicely. Your filling mixture is ready.
5. Take out your pie/tart pan from the fridger. Pour the filling in the pan.
6. Take a large baking tray and place the pan in that tray. It will avoid any spilling in the oven.
7. Place the tray in the oven with careful hands. Bake it for 45-50 mins.
8. Once it is baked take the tart pan out and let it cool for some time.
9. Cut the pie into slices and serve.

(Note: You can customize your filling with your choice of vegetables, meats and cheese)


Serve a slice of pie with hot sauce. It will bring the perfect balance of savoriness. You can have it with lettuce salad with olive oil and lemon vinaigrette. You won't feel guilty of having so much cream, cheese and butter. But hey, weekends are made to enjoy these guilty pleasures. Don't worry do some extra exercise in the weekdays. Try this recipe in the next weekend breakfast/brunch. Enjoy it with your family.
Thanks,
Moumita