Thursday, August 30, 2018

Moong Bahar

Hey guys,
How is your week? Mine is good, feeling little lazy. Sometimes you should enjoy the laziness amidst all the work. You should have some time for yourself for self-reflection. So, I have decided to share a lazy comfort food today. The name of the dish is Moong Bahar. It is a moong dal with the assortment of veggies. I would like to thank Subhangi, a close fiend of mine, for this recipe. We visited her at North Carolina during last thanksgiving. At that time, she prepared the dish. After a long journey by road, it tasted like heaven. And it was added in the list of my favorites. Now, whenever I have a chance to entertain my guests, this dal pops up for the lunch. Dal-vaat is a soul food for most of the Indians, but this dal is special. Kids also like this dal and mommies should be happy as their kids are getting the dose of veggies. I know, this will be the helper for mommies during feeding their babies. As a mommy, I know, sometimes it becomes a challenge. This dal is savory but little sweet on the taste. Have I mentioned the secret ingredient of this dal. Yes, there is a secret ingredient and that is hing (asafetida).  The flavor of the thing will take the dal from boring to a new interesting level. As a bong kid, I love this kind of veggie dal with rice and kurmure alu vaja (fried crispy potato strips). If you are a bong, please do comment if this feeling reciprocated to you. Do comment if you want me to share the recipe of the crispy potato fries. Now, coming back to the dal bahar, let's see how to make it.

Moong Bahar
Moong Bahar


Recipe yields 8 servings


Ingredients

2 cup moong dal(Petite Yellow Lentil)
1 cup small chopped carrot cubes
1 cup small chopped green beans
1/2 cup peas
1 cup small chopped cauliflower florets
1/2 cup small chopped coconut pieces
2 bay leaves
2 red chilies
1/2 tsp hing (asafetida)
1/2 tsp cumin seeds
1/2 tsp turmeric powder
1/2 tsp Bengali garam masala powder (recipe in the Comfort Saveur)
1/2 tsp ghee
1 tbsp ginger paste
2 tbsp mustard oil
Salt according to your taste
Sugar according to your taste
Water to boil the dal
Ingredients
Ingredients

Methods


1. First heat a sauce pan and add the dal. Dry roast the dal over medium heat. Stir it with a spatula repeatedly. The dal should be golden brown and a nice nutty aroma of the roasted dal should fill the house. Don't overcook it and the dal should not get browned or burnt. Keep a close eye on it.
2. Once the dal reached golden brown color and became little opaque add around 4 cups of water and start boiling it in medium high heat. You can do this step in a pressure cooker. And two whistle should be enough to cook the dal. But I would recommend to cook the dal in the sauce pan as it tastes better. And you can easily check on it and get an optimum texture of boiled dal. The dal should not be completely boiled into a yellow mass. The dal pieces should be soft and some of them should retain the shapes.
3. When your dal is boiled, heat another frying pan. Add the oil. When the oil is hot, add the cumin seeds, dried red chilies, bay leaves and 1/4 tsp hing. It should start sizzling and make popup sounds.
4. Add the veggies and fry them. Add salt and turmeric powder. Then add the ginger paste. Stir it and mix it nicely and continue to fry a little. Then cover it with a lid for 3-4 minutes.
5. Open the lid and the veggies should be soft enough. Give a good stir for a minute and then add this veggie mixture into the boiled dal. Mix it nicely.
6. Most importantly taste the dal. Add salt and sugar accordingly. This dal should be on little sweet side. So, add the sugar considering that. Now mix it nicely with the veggies. Now if you want your dal to be little runny add more water (about a cup). If you want your dal to be thick keep as it is.
7. Heat this dal again till they mix with each other and comes to a boil. At the end add 1/4 tsp hing and give a good stir. Finally add the ghee and the Bengali garam masala and mix it nicely. Preparation of a nice flavorful Bengali garam masala is already posted in Comfort Saveur. Stop the heat.
Boiled Dal
Boiled Dal

Cooked Veggies
Cooked Veggies

Moong Bahar is served with rice and crispy potato fries


Serve this dal with hot basmati rice and some potato fries.  Give me this plate and I will be one happy soul. I won't even look at the non-veg items. Some days you feel like having a simple lunch with few items. Here is that item, which will make you lazier. As having this and a good nap will be a comfort and lazy indulgence but it can rejuvenate to a new you with lot of energy. Let me know how did you like this post in the comment section. I always love to read your comments. I will be coming up with a new recipe in the next post soon.


Thanks,
Moumita


Monday, August 27, 2018

Tandoori chicken

Hi guys,
Hope you are doing good. So, friends I will be sharing a recipe which was requested by a close friend. Thank you Piu for asking me to make this recipe. This one is a favorite of my mom and mamoni, my mother-in-law. Every time I visit India, it has now become a ritual to prepare this one. Oops, I haven’t mentioned the name of the dish yet. It is Tandoori Chicken. Whenever my parents and in-laws visit here, I have to prepare this one. They would request me and also they wish that their neighbors and friends could taste this home made Tandoori Chicken. Who does not know Tandoori Chicken? Tandoori Chicken seems popular among people from different nations. It is a chicken dish, which is maintained in a yogurt sauce and grilled in a Tandoor - a cylindrical clay oven. While researching about Tandoori Chicken, I found an interesting fact, that is, it has originated as Harappan delicacy. When I started my new journey after marriage with my husband and destined to stay at United States, I found an oven in my apparent. I was very excited as I haven't seen it before in India. I started looking for the recipes of baked foods. I started baking and now I love baking. Those were the days, and they were very special because I started learning the art of cooking. Surely, I miss those days. At that time, I started experiments to get the actual taste of Tandoori Chicken. With the help of Internet and many trial and errors, I have reached to the recipe of this flavorful tandoori. Now, I have made so many times. Sometimes I feel that I can make it in my sleep. But I should mention, it does require some planning. You can't cook it in a hurry. It needs marinating for overnight. Please don't cook tandoori chicken if you have no time. You won't get the same taste.
So, let's make some tandoori chickens.

Oven baked tandoori chicken
Tandoori Chicken

Side view


Recipe yields 4 servings

Ingredients

4 Chicken leg quarter
1/2 cup thick yogurt (Greek yogurt / hung yogurt )
Juice of a lime (around 2 tbsp)
2 tsp salt
2 tsp chili powder
2 tsp coriander powder
2 tsp cumin powder
1.5 tbsp crushed fenugreek leaves
8-10 drops of red good color
1 tsp of chat masala
Half lime
4 tbsp of oil
Salt according to taste
Sugar according to taste


Ingredients
Ingredients


Methods

1. Take clean chicken leg quarters and pat them dry with the paper towels. The leg quarters should not have water on its surface.
2. Once they are dry enough, take a leg quarter. On its top surface, make some (4-5) deep slit marks with a knife. Repeat it for all the leg quarters.
3. Now make a mixture of chili powder, salt and lime juice. It should be like a paste.
4. Apply the paste in the slits of chicken pieces. Go deep do that you can feel the bone with your fingers. Apply this paste on the bottom surfaces. Don't forget to apply on all the nooks and crannies of the chicken pieces. The chili mixture should be finished.
5. Once all of the mixture is applied, add all the chicken pieces, yogurt, cumin powder, coriander powder, salt, sugar, crushed fenugreek leaves, food color in a large mixing bowl. Mix them very well with clean hands. God have given these two utensils. So, use it. Message all the pieces of chicken with the creamy yogurt mixture. Don't forget the bottom surface of the chicken pieces.
6. Add 2 tbsp of oil in the bowl  and mix it again nicely.
7. Then cover the bowl and keep it in the fridge for overnight. If it is some hours more than overnight, don't worry, it will taste better.
8. Preheat your oven at 400 F.
9. Now take a large baking pan and cover it with a aluminum foil. Add 1 tbsp oil and spread it uniformly on all over the pan. Place the marinated chickens on the aluminum surface with the bottom surface on the down. Add 1 tbsp of oil on the top surfaces of every chicken pieces.
10. Bake it for 35 minutes. Then take the baking pan out and flip those chickens on the other sides. You can see lot of juices came out on the pan. And don't forget to wear your mittens while doing this.
11. Bake it for another 20-25 minutes and check it in between. It depends on the oven to oven. So keep an eye. The chicken should not be dry, those should be juicy.
12. Now take those out and give another flip. Squeeze the juice of half lime on all over the top surface of chickens. Sprinkle chat masala over it. And again place the baking pan in the oven.
13. Now press the broil button. Broil it for 2-3 minutes. Check it in between so that it won't get charred. I would recommend to keep the oven door little open so that you can peek and check whether the desired burnt marks appeared on the surfaces of the chicken.
14. You can flip again and add the lime juice and chat masala And broil the surface for a minute. But this is optional. You can do it if you want more charred flavor on your chicken.
15. Serve the tandoori chicken with onion slices, lime slices and some mint yogurt sauce. For mint yogurt sauce you need

1/3 cup of yogurt
1 tsp minced garlic
1/4 tsp black pepper
2 tsp chiffonade mint (roll all the mint leaves as a bundle and cut it into thin ribbons )
Salt according to taste

Mix those ingredients well in a bowl. And serve it with Tandoori Chicken as a dipping sauce.
adding the chili lime salt paste into the slits
Adding the chili lime salt paste into the slits

Mixing the ingredients for marinate

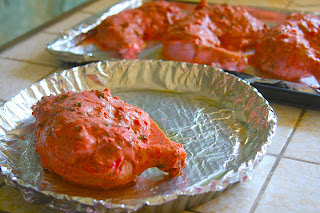
Marinated Chicken
Marinated Chicken

Ready to hit the oven
In the oven
In the oven
Baked tandoori chicken is ready for chat masala and lime juice
Finally, served with mint yogurt sauce

You can try it as appetizer as well as a main course for the dinner with rice pulao/pilaf or butter garlic naan. This  tandoori chicken is so juicy and succulent that you will lick off your fingers and the flavors from the spices will win your heart. You can also  prepare this as an barbecue dish by grilling it on your backyard grill. Please comment if you have any question regarding ingredients or methods for cooking this one.

Thanks,
Moumita


Tuesday, August 21, 2018

Kalakand

Hi friends,
Hope you are doing good. Did I mention that my whole family are dessert lovers? Yes, they are including me. And hence I have a stock of dessert recipes under my sleeves. Those will be shared slowly. Today it's the turn for killing Kalakand. It is a very easy recipe and can quickly impress your guests. Kalakand is an Indian cheesecake made out of cottage cheese/paneer and condensed milk. It is a very popular sweet, which is widely available in all parts of India and it can be easily available in the Indian store around the globe. Today I will share two methods; one on the stove and the other in the microwave. You won't feel any difference in both the results. Since it is homemade you can control the sweetness.
Let's start rolling.
Easy and quick recipe of kalakand on stove top and microwave
Kalakand


Recipe yields 16 servings

Ingredients
  1. 1 cup of ricotta or chenna
  2. 3/4 cup of condensed milk
  3. 1 tbsp of milk powder
  4. 1 pinch of cardamom powder
  5. 1 tbsp of chopped pistachios for garnish
  6. 1 tsp of almond slices for garnish
  7. 1 tsp ghee
Ingredients for Kalakand


Method for making on the stove top

1. In a pan add all the ingredients except nuts and cardamom powder. Start heating the pan in medium heat.
2. Stir it with a spatula. So that the mixture doesn’t get burn or get brown. Keep a close eye on the mixture while cooking. It should be white in color. And it needs baby sitting and stirring continuously.
3. Remove the heat when the mixture is little dry and soft solid in texture. Add the cardamom powder and mix it well. When the mixture is leaving the sides of the pan, then it is done. It should take around 10 to 12 minutes.
4. Grease a baking pan or a plate with some ghee. Now add the cooked mixture on the greased pan and spread it in one layer using a spatula. Try to make a thick layer.
5. Sprinkle the nut all over the surface. Press those gently with careful hands over the Kalakand surface. Let it cool for half an hour.
6. Now cut into proper shapes and sizes. Kalakand in general is known for its square shape. So try to cut into medium squares and enjoy.


Methods for making it in microwave

1. Add all the ingredients except nuts and cardamom powder in a microwave safe bowl. Microwave it for 2 minutes.
2. Stir and mix it well with a spatula so that the mixture doesn’t get burnt or get brown. Again microwave it for a minute. Then mix it with a spatula and microwave it for another minute.
3. Now take the bowl out and add the cardamom powder and mix it very well. Then microwave it for another minute.
3. Remove the bowl from microwave. The mixture should be little dry and soft solid in texture. It should take around 5 to 6 minutes (time may vary due to heat levels of different microwave). The heat level of the microwave should be high.
4. Grease a baking pan or a plate with some ghee. Now add the cooked mixture on the greased pan and spread it in one layer using a spatula. Try to make a thick layer.
5. Sprinkle the nut all over the surface. Press those gently with careful hands over the Kalakand surface. Let it cool for half an hour.
6. Now cut into proper shapes and sizes. Kalakand is known for its square shape. So try to cut into medium squares and enjoy.
Mixing the ingredients

Kalakand


Celebrate any occasion with a plate of Kalakand square. This is such an easy quick recipe that you can make it in a jiff. The microwave Kalakand only take 6 minutes to cook.  And you can control the sweetness by the amount of condensed milk. So, don't wait anymore. Prepare it and celebrate any day with your family. It will amplify the sweetness of the life.


Saturday, August 18, 2018

Bengali Garam Masala

Hi Guys,
Today I will share the recipe of Bengali Garam Masala. It is a magic masala for many quintessential Bengali dishes. Though it is composed of only three ingredients but the fragrance and the flavor are strong enough to make a boring dish quite interesting. Since many Bengali recipes need this masala, I thought I should quickly share this. The Bengali garam masala is different from any other garam masala and even it is different from the Shahi garam masala. Just a dollop of Bengali ghee and Bengali garam masala is enough to quirk up your everyday meal. It has only three ingredients - cloves, cardamom and cinnamon sticks. It can be easily stored in a clean glass jar with the lid tightly closed. It easily stays good for around 6 months. So, let's see how it is prepared.

Bengali Garam Masala


Ingredients

1/3 cup of green cardamom (elach/elaichi)
1/3 cup of cloves (lobongo/laung)
1/3 cup of small shards of cinnamon stick (darchini)

Method

1. Heat a griddle/tawa. Add all the ingredients.
2. Dry roast it in medium low flame. Stir it few times. Your house should smell like those spices.
(Note: Don’t over roast them or make them brown)
3. Take those roasted spices and let them cool.
4. In a coffee grinder add those spices and grind them till it becomes coarse powder.
( Note: Don’t use the same coffee grinder where you grind coffee beans. Keep a separate coffee grinder only for the spices.)
5. Store the powdered garam masala in a clean jar with the lid on.
Bengali Garam Masala is ready


Enjoy this magic masala whenever you need it. As I will be sharing recipes using this Bengali Garam Masala as an important spice. This spice not only flavors many Bengali dishes, it can also go with different cuisines. To share my secret, it is one of the humble ingredients to experiment fusion food.

Thanks,
Moumita


Friday, August 17, 2018

Fish kabiraji ( Fish Coverage Cutlet)

Hello guys!
How are you? I know I always start with the same question. Actually I wanted to get connected with you via this blog. You can answer me through the comment section. Few days ago, in the Facebook I asked what recipes you want to see in my blog. I got an overwhelming response and received a list of items. So I will be sharing the recipes of those requested items and also there will be recipes of items, which I wanted you to try. Today I will share the recipe of most requested item, that is Fish Kabiraji. The word Kabiraji seems Bengali. But actually it originated from the English word “coverage” . The history of this dish goes back to the British era in Bengal when this cutlet got its name transferred from coverage to Kabiraji. Kabiraji is a (fish/chicken/mutton) cutlet covered in fried egg net and quite popular in bengal cafes. The taste of Kabiraji started to fade from my mind. But after many experiments this recipe strongly rekindled my taste of the previous Kabiraji, which I had enjoyed few decades back. I am sure after trying this recipe you will also get the pleasure of this savory.
Now, let begin.
Fish Kabiraji
Fish Kabiraji


Recipe yields 8 servings

Ingredients for fish cutlet

  1. 2 large tilapia fillet cut in to 4 pieces each ( Note: Bhetki fillets or Bass fillets also work)
  2. 1 inch ginger
  3. 5 cloves of garlic
  4. 1/3 cup cilantro leaves
  5. 1/4 cup mint leaves
  6. 1/2 medium onion chopped into medium pieces
  7. 2 green chilies
  8. 1 tbsp lemon/ lime juice
  9. 1 tsp Bengali garam masala powder
  10. Salt according to taste
  11. Sugar according to taste
  12. 1.5 cups bread crumbs
  13. 1/2 cup chickpea flour (besan)
  14. Oil for frying

Ingredients for the marination of fish

Methods

1. In a blender jar add ginger, garlic, onion, cilantro, mint leaves, chilies and little water. Blend it till it forms a green paste. (Note: Try to add little water as possible)
2. Take the clean fish pieces in a bowl. Add salt and lemon/lime juice and coat all the surfaces of the fish.  Then add the green paste and mix it well so that every piece of fish is coated in the green paste.
Now marinate the fish for around 1 hour minimum.
3. Take chickpea flour in a plate and spread it evenly.
4. In another plate spread the bread crumbs in one even layer.
5. Take a marinated fish piece and lightly dust in the chickpea flour on both the surfaces. And then coat it with the bread crumbs. Try to shape the fish piece into small cutlet shape with the bread crumbs.
(Note: Don’t wipe off the marination from the fish pieces. Don’t worry, the fish should be like cutlet shape as they will be covered again in the egg net)
6. Repeat step 5 for all the pieces of fish.
7. Once they are all coated with bread crumbs, heat some oil in shallow large pot. The oil level should be enough for deep frying.
8. When the oil is hot, fry the cutlets on both sides for 3 minutes each.
9. Take out the fried cutlets on a plate with dome paper towels to drain the excess oil

Ingredients for the egg net

1. 5 large eggs
2. 1 tbsp  + 1/2 tsp of cornflour
3. 1/8 tsp of rock salt
4. 1/8 tsp of Bengali garam masala powder

Methods
1. Crack the eggs in a bowl. Beat it well. Now add the cornflour and mix it well so that there us no lumps. ( Note: use clean hands to mix)
2. Heat the oil in the same pan where you fried the fish.
3. When the oil is hot, sprinkle the egg mixture on the oil across the diameter of the pan. It will create a bed of egg net. The heat should be medium now.
(Note: Take large shallow pan whose diameter is large, so that you can make a large rectangular egg net. The larger the egg net, it will be covered well and tastes better.)
4.  Take fried fish cutlet and dip it in the egg mixture. Place that near the front end of the bed of egg net.
5. Now try to cover the fish cutlet by flipping the cutlet side. And again give another flip. It will be covered completely.
6. Turn the heat from medium to medium high. Fry the fish covered package for 2 mins and flip it and again fry the other side 3 to 4 minutes.
7. Repeat the steps 2 to 6 for all the cutlets.
8. Take those out in a paper towel lined plate. And sprinkle a pinch of rock salt and a pinch of garam masala on the surface.
Frying the fish cutlet

Making the egg net
Making the egg net

Placing the cutlet on the bed of net

Covering it by first flip

Another flip
Another flip

Finally frying both the sides
Fish Kabirazi is served
Fish Kabirajiis served

Serve these Fish Kabiraji with some cucumber slices, onion slices, some pieces of lemons and definitely a good amount of Kasundi. Sprinkle the lemon juice on the cucumber and onion slices and dip the Kabiraji on the Kasundi. Do I have to mention the next step. Yeah, grab a bite and you will definitely imagine yourself to be a regular customer of Basanta cabin. I have done many trials of the Kabiraji recipe. But this one wins our heart as it reflects our past experience with Kabiraji. Please try it and let me know your thoughts about this recipe. I am sure you can also recreate it and walk down your memory lanes, especially if you are living outside of West Bengal.

Thanks,
Moumita


Monday, August 13, 2018

Kulfi bhapa sandesh

Hello friends,

How was the last week? It was hot and humid at my place in the last week. The weather gave an idea to make an easy dessert that has dual duty. It tastes like kulfi (an Indian style ice-cream) but in the form of sandesh (a typical Indian sweet). It will satisfy the cravings for the kulfi in this hot summer. A month ago first time when I made it for my friends, it was a instant hit. So I decided to share it with you. Kulfi bhapa(steamed) sandesh is a quick elegant dessert but has the power to impress your guests. This dessert can bring your childhood smile as it tastes like kulfi, but it would not create any mess while enjoying it. Without using any more words, lets start making it.

Kulfi bhapa sandesh
Kulfi bhapa sandesh


Two slices of Kulfi bhapa sandesh
Two slices of Kulfi bhapa sandesh


Recipe yields 8 servings


Ingredients


3/4 cup of ricotta/chenna
1/2 cup of whipped cream
2 tbsp condensed milk
2 tbsp powder/confectioner sugar
1 tbsp almond slices
1/2 tbsp almond slices for garnish (optional)
1/2 tbsp pistachio chopped into small pieces for garnish (optional)
1 tbsp mango puree
2 tbsp Rooh Afza syrup
1/8 tsp of saffron
1/2 tsp ghee/butter

Ingredients for Kulfi bhapa sandesh
Ingredients 


Note: If you can’t find ricotta, you can use chenna with 1 tbsp milk. If you have paneer, then grate it and mix it nicely with 3 tbsp of milk in a blender. Blend the ingredients for 2 minutes. You will get ricotta like texture.


Methods

1. In a bowl add the whiping cream and start whipping it for 4 to 5 minutes.  It should reach soft peak state.
2. Crush the saffron by fingers and add into the bowl of whipped cream.
3. Crush the almond slices into small pieces and add them into the bowl of mixture.
4. Add the ricotta, condensed milk, confectioner sugar and mix it nicely. Follow the cut and fold method to mix it. Cut the mixture and fold it with the help of spatula. This will prevent loosing the foams of the cream. The mixture should be uniform and slightly foamy.
5. Grease an 8" baking pan with ghee or butter. Add the mixture into the pan.
6. Add few drops of mango pulp puree and Rooh Afza syrup on the surface of the mixture.
7. Try to make some lines or curves from the drops with the skewers . It will give a marble effect. You can decorate with some more almond slices and pistachios pieces on top of it. This is optional. Then cover the pan with a aluminum foil.
8. Now take a steamer pot and add some water. Start boiling the water. When the steam is ready place the baking pan in the steamer. And cover the steamer. Steam it for good 30 minutes. (Note: If you don’t have a steamer no need to worry. You can use a deep pot and start boiling some water in it. When steam is ready place a colander that would fit in the pot. Place the baking pan . Cover the top of  colander with a lid. It should work.)
9. After 30 minutes, take out the baking pan. Allow it rest outside for another 30 minutes. Don’t open the aluminum foil. I know you want to have a peak. Trust me, it’s alright and you can have that special look later. When it is at room temperature, keep the baking pan (with aluminum foil covered ) into the fridger for 3 hours.
10. After 3 hours take out the baking pan from the fridger. And allow another 30 minutes to rest till it attains the room temperature.
11. Take a knife and trace the sharp point around the edge of the pan so that the mixture gets loosen from the edges.
12. Now place a round platter/plate on the surface of the pan and flip it. The frozen mixture should fall off easily on the plate. And then you can cut some slices of it or cut into any shape of your choice.
(Note: Don’t keep the leftovers in the fridger but store them in the fridge.)

Drawing on the drops of rooh afza and mango pulp

Steaming
Steaming

Kulfi bhapa sandesh is served
 Kulfi bhapa sandesh is served

Serve this cold slices of kulfi bhapa (steamed) sandesh as dessert in this summer. Try making it and let me know how cool this dessert is. This does need some planning as it requires freezing. But that planning will satisfy your crave and you will be definitely sorted for any summer party. This is summer. And hence keep calm and enjoy the spoon of this heaven.

Thanks,
Moumita


Wednesday, August 8, 2018

Salmon Paturi

Hi Guys,
Hope you all are doing fine. In my native place (Kolkata in general) people are now enjoying Ilish (Hilsa) of the rainy season. But in many parts of the global village there is not enough opportunity to get a good quality or any Hilsa. I think that is why Salmon is created by the God. Today, I will be talking about a dish which is usually prepared with Hilsa or Bhetki. But the love for the Salmon bugs me to experiment this recipe. Don’t worry, I won’t make you cook something distasteful. It was an successful experiment and hence I am sharing the recipe. The recipe I am talking about is called Paturi. Paturi is a method to cook ingredients wrapped in a leaf. The package of leaf is roasted on a griddle or tawa and steam-cook the ingredients inside. The leaf is typically banana leaf (the leaf also brings flavor while roasting) and the ingredients can be veg or non veg. This paturi almost resembles En papillotes - a French cooking method where ingredients are cooked by the steam generated from the wrapped paper pocket. The cooking method with wrapped leaves can be found in many geographic cultures and they use variety of leaves for wrapping like banana/plantain, corn husk, lotus, grape, bamboo, taro, yam, etc. I have used Salmon as the basic ingredients as it has a distinct flavor, less bones and buttery texture. From my previous experience with Salmon, I know Salmon and mustard poppy seeds paste are best buddies.
Hence I came up with the mustard poppy seed coconut sauce to coat the fish. They go very well together. Everything blended well and developed the origin of the dish - Salmon Paturi. Lets start the cooking.
Salmon Paturi with white rice

Salmon Paturi
Salmon Paturi


Recipe yields 4 servings

Mustard poppy seeds coconut sauce

Ingredients for the mustard coconut sauce

  1. 1 tbsp black mustard seeds
  2. 1 tbsp yellow mustard seeds
  3. 1 tbsp poppy seeds
  4. 2 tbsp shredded coconut
  5. 3-4 green chilies (according to the heat you can handle)
  6. 2 tbsp yogurt
  7. 2 tbsp mustard oil
  8. 1/2 tsp turmeric powder
  9. 1/4 cup of water
  10. Salt according to your taste
  11. Sugar according to your taste


Methods

1. Soak the black mustard seeds, yellow mustard seeds and poppy seeds in water in a bowl for at least an hour. After an hour you can see the seeds have pulped up and became soft.
2. Now in a blender jar add the soaked seeds and chilies. Blend it for a min. Add the shredded coconut and blend it for another min. You can see all the seeds are pulverized and coming in the form of paste
3. Add yogurt, salt, sugar and turmeric powder and again blend it for 2 minutes. Now you can see it as a yellow sauce. Taste it and adjust salt and sugar accordingly.
4. Add the mustard oil and mix it with a spoon. It will emulsify the solution. And finally your sauce is ready for the fish.
(Note: The sauce should be little thick not completely runny. So try to avoid water while blending.)

Now comes the packaging of the fish in the banana leaf. While roasting the wrapped packages , the flavor of the leaves mingles in the fish.


Ingredients

  1. 4 banana/plantain leaf of size 8 x 8 ( approximately)
  2. 4 kitchen stings of length 1 yard (approximately)
  3. 8 green chilies
  4. 4 tbsp of mustard oil
  5. 4 pieces of Salmon
  6. Mustard poppy seeds coconut sauce
  7. Salt according to your taste
  8. (Note: For the friends who are in US: The banana leaves can be found in Indian stores.)

Ingredients for Salmon Paturi

Methods

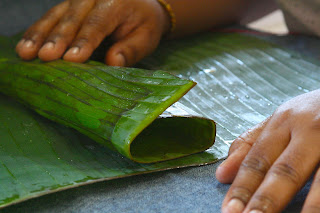
1. Prepare the banana leave by dry roasting them on the heated tawa/griddle pan. Dry roast both the surfaces of the leaves. It will make the leaves soft and it can be easily folded.
2. Sprinkle some salt on both surfaces of the fish. And mix it well.
3. Marinate the pieces of fish in half of the sauce. Reserve the other half.
4. Take one dry roasted leaf and lay it flat. On one surface add one tsp of the sauce. Spread it a little and add the marinated fish on top of it.
5. Add one more tsp of sauce over it and place two green chilies on top of it. Then drizzle 1/2 tbsp of mustard oil on the top.
6. Now close the two sides and hold it tight. Then close the other two sides making it as a gift parcel. Holding it tight in one hand, wrap the kitchen string with another hand. Wrap the string around the package as many times as you need and at the end tie a knot. (Note: Don’t make too tight as it can break the fish. Also don't make it too loose so that all the sauce drip.)
7. Repeat the step 4 to 6 for the rest of the fish.
8. When all the fish parcels are complete then heat the tawa or frying pan with flat surface. Add and heat 1 tbsp of mustard oil. When the oil is hot enough, place two packages and fry it one side for 4 minutes and flip it and fry another side for 4 minutes. While frying cover it with a lid in between so that the fish is cooked from inside. The heat should be medium to medium high.
9. Take out the two cooked paturis and add the remaining one tbsp if oil on the heated tawa or pan. Fry the remaining two uncooked paturis as mentioned in step 8. When they are cooked, take out from the pan and let it rest with the other paturi pieces in a serving dish for a while.
Dry roasting the banana/plantain leaf

pouring the golden sauce

Salmon with the sauce

Chilies added
Chilies added

Drizzling mustard oil

Folding the sides
Folding the sides

Package folded
Package folded

Paturi before cooking

Good things come in small packages

Time to serve it with rice


While serving keep a pair of scissors nearby to cut the strings. It should be served with steaming white Basmati rice. I would recommend making some extra rice. You never know you may need it as good things come in small packages. Trust me, you will fall in love with this dish as soon as you take the first bite. If you are having some guests for lunch, definitely try this recipe  and your guests will be go oohs and aahs with praising you. Make it, devour the heaven and thank me later.

Thanks,
Moumita


Monday, August 6, 2018

Chicken Burger

Hi guys,
How are you doing? How many of you have favorite burger joint? As a foodie, I love different cuisine. Thus burger too finds a placed in my heart. Sometimes I crave burger and French fries. I know these junk foods are not healthy for our body. Hence I came up with a burger recipe, which has fresh nutritious, ingredients and it also fills the soul. You can easily consider this dish as a burger night dinner with the family. I also have swapped French fries with the oven baked sweet potato strips which really complement the burger. The combo dish won’t make you guilty of eating junk food as well as it will satisfy your cravings. Now lets crank up the heat.

Chicken Burger with sweet potato fries


 Recipe will yield 6 servings

Ingredients for chicken burger paties

  1. 1.5 pound ground chicken
  2. 1 medium green bell paper chopped into small pieces
  3. 1 small onion chopped into small pieces
  4. 1/2 cup shredded mozzarella cheese
  5. 1 tsp lemon juice
  6. 1 tsp freshly crushed black pepper
  7. 1 tsp garam masala powder
  8. 6 slices of pepper jack cheese
  9. 2 tbsp oil for burger + 1 tsp oil to grease the grill pan
  10. Salt according to taste
  11. Aluminum foil


Methods

1. In a mixing bowl dump all the ingredients except oil and cheese slices. Mix it well.
2. Add 2 tbsp oil into the mixture and mix in one more time. Now from the mixture, try to make three equal portion by eye balling. Now divide each of the three portion into half. You will get six almost equal portions. Now put some oil in your hand and try to make a disc out of each portion. Repeat for all the portions and you will get six burger patties.
3. Heat a grill pan and grease it with remaining oil. When the grill pan is hot, place burgers. Cook it for 5 minutes on one side. Flip it and cook the other side for another 5 minutes. The secret of juicy burger is never ever press the burger.
4. When the burger is cooked on other side add slices of cheese on the burger. Cover the pan with the lid and cook for 1-2 minutes till the cheese melts. When the cheese is molten, take those out of the pan and put them on a plate. Cover them on the plate with a aluminum foil.
Chicken burger patties hitting the hot grill

Cooked Chicken Burger

Molten cheese on the burger


Now comes the assembly of the masterpiece with the choice of buns and toppings.

Ingredients for the assembled burger

  1. Brioche buns
  2. 2 tsp of butter
  3. Avocado cut into slices
  4. 1 tsp lemon juice
  5. Red lettuce leaves
  6. 3 tbsp of mayonnaise
  7. 2 tsp of Black pepper

Brioche Buns, Avacado, Tomato, Pepper Jack Cheese Slices and Lettuce


Methods

1. Prepare the bun by slathering butter on the inner sides of the bun. Toast the buns on both sides for a minute and by flipping once in between.
2. Take out the buns from the grill. Keep all the buns open faced. Now slathered mayonnaise on the inner sided faces. You will have 6 bottom buns and 6 top buns.
3. Add lemon juice to the avocado slices. Mix it well carefully so that slices don’t break.
4. Arrange the avocado slices on the mayo bed of the bottom buns as a layer.
5. Place the tomato slices on the avocado base. Sprinkle some salt and pepper on the tomatoes.
6. Now come the show stopper burger patties. Place them on the layer of tomato slices
7. Place the lettuce leaves by folding the leaves on top of the burger patties.
8. Now finally cover the patties with the top bun lids.
Avocado Slices added

Tomatoes added

Lettuce added

Chicken Burger


Baked sweet potato fries

Ingredients

  1. 2 sweet potatoes
  2. 1/2 tsp sea salt
  3. 1 tbsp oil


Methods

1. Preheat the oven to 400 F
2. Wash the sweet potatoes, peel them, then cut them into strips.
3. Add the oil to sweet potatoes strips. Mix it well so that they are coated in oil.
4. In a baking tray arrange the strips in one layer as evenly as possible.
5. Bake it for 18 minutes. Take out the baking tray and flip them with a spatula.
6. Again bake them for another 16 minutes. Now take the baking tray out of oven. Sprinkle some sea salt over the potatoes and give a good stir.
7. Let them cool for a minute or two and serve them hot with the burgers and ketchup.
Sweet Potato in the oven

Serve the chicken burger and the fries with ketch up or honey mustard sauce. Make it as a weekend dinner. Let me warn you, it's a messy food. So hold your sleeves up, grab the burger tight and take a big bite. It will definitely bring a happy smile in your face when you can enjoy the juice burger not at any burger joint but at your own nest. This recipe can also be considered as go to lunch menu for the office and it is very filling and healthy too. Let me know in the comment section how do you like it and how much mess you created.

Thanks,
Moumita